QuickBooks Condense Repair Tool or condense data utility helps to organise the Company data file. At several instances, when you are trying to archive the data file, you might encounter a system error that hinders QuickBooks from condensing the ‘Data file.’ QuickBooks Condense Repair tool is the troubleshooting device that will solve the issue.
This article will enumerate details about the Condense repair or Condense Data Utility with its significance, usage, functionalities, limitations, etc.
What is QuickBooks Condense Repair Tool?
The new condense feature in QuickBooks Desktop 2019 gives an option to remove the audit trail that lessens the file size but keeps the detailed transactions intact unlike the traditional File Condense feature.
If you have an oversized file that is acquiring excessive space, then QuickBooks Condense repair can help to minimize the file size without any data damage. The Condense feature in the new version is also faster than was in the previous ones. To access this feature, follow the below steps:
- Go to File
- Tap Utilities
- Now press Condense Data
- Choose the first option as shown below.
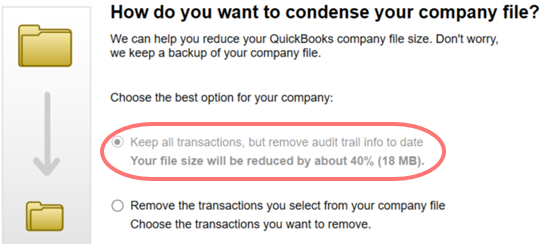
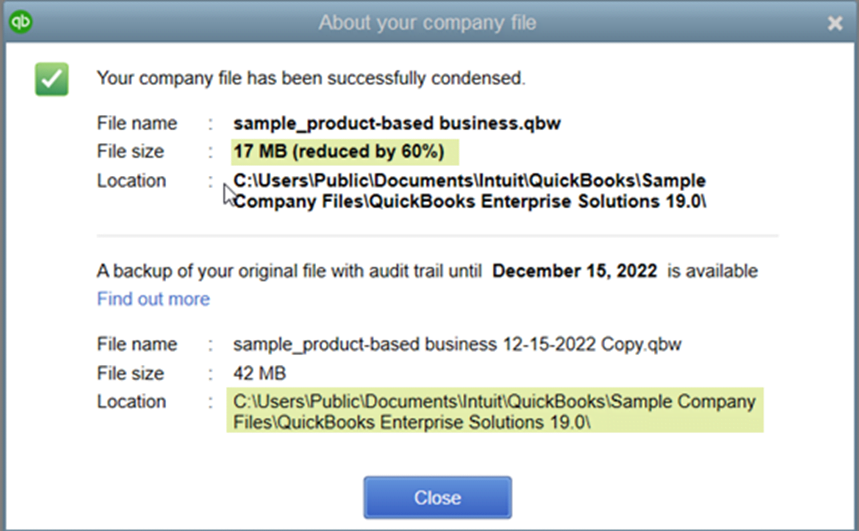
- Choose ‘Next,’ and you will see a notice saying ‘Working on your file.’ Once the process is complete, there will be a window telling you the total reduction of the file size and the location of the backup before file optimization.
QuickBooks Condense Repair Tool Functionalities
QuickBooks Condense Repair Tool is important and useful, however, once you Run the tool to Condense a file it has a different result on different sections. You need to be fully aware of all the functionalities and its after-effects to attain the desired result. We will discuss now what effect does ‘Condensing a file’ has and till what context.
1. Non-reversible
If you are looking to condense your company data file, first ensure that ‘Condensing’ is the best Option for you. It is non-reversible once done, so it is highly recommended to try out other options before. Below given are some relevant reasons to use ‘Condense’ feature.
- A large Data File
- You have upgraded all your hardware
- You are close to a list limit
- Your accountant & technical support have agreed to it as the necessary option. They have already considered all other options.
2. May not reduce file size in some cases
If you use ‘Inventory items’, then your list doesn’t get reduced. As a result, very few transactions may get Condensed with minimal change in the file size. Additionally, open transactions do not get condensed without affecting the File size.
3. May not Fix File damage
When you are looking to repair a damaged Company File thorough ‘Condense utility’, sometimes, the Condense feature might not repair a ‘damaged Company File.’ Use methods such as Restore a backup company file or Create a new company file to repair the damage. The Condense feature in QuickBooks does not remove the below-listed transactions.
a) Payroll transactions
It will not condense payroll transactions if it is dated before 31 Dec, or an employee’s W2 is not analyzed and reviewed.
b) Invoice, Payments, refund checks, & credit memos
These will also not be removed if not linked properly to each other.
c) Payments recorded to Undeposited Funds
The ones which are not deposited to a Bank Account
d) Bill Credits, Bills, Bill Payment Checks
These documents will not remove if not linked to each other properly.
e) Estimates linked to Invoices
As estimates are non-posting entries & cannot be condensed to journal entries
f) Sales Tax that is not paid in ‘Pay sales Tax’
When you pay sales tax with checks then it leaves invoices open that are ‘Non-condensable.’
g) Transactions linked to a Non-condensable Transaction
If the transaction has linked to a non-condensable transaction that will also be Non-condensable.
4. Affects specific reports
The Condense feature affects several reports differently.
a) Account based & Item based report will be entirely accurate as the entries on the account do not get affected.
- Profit & loss (accrual).
- Balance Sheet (accrual)
- Trial Balance (accrual)
- Cash Flow statement (accrual)
The below Item based reports will be Blank because all item data is gone.
- Sales & Purchase reports
- Job costing reports
- A/R & A/P aging reports
b) All Cash Basis Reports
These reports will also be inaccurate.
c) Reports filtered by class
The transactions that are summarized by the utility will not have classes assigned. If you will RUN a Profit and Loss report by class that will show all amounts in the ‘Unclassified Column’.
d) Sales tax liability report
When you condense a journal entry, subsequently an amount is credited to the income accounts. However, QuickBooks does not know which part of the income is taxable and which is non-taxable. Moreover, the tax collected that comes from the invoices and no longer exists will show zero.
e) The Accounts Receivable collections report
The A/R collection report reflects ‘Condensed Journal Entries’ under ‘No name.’ Moreover, the entries to A/R which are not linked to the closing transactions are shown as open.
f) Sales & Purchase Detail Report
This report will be blank, as there are no more invoices and bills.
g) Audit Trail Report
The ‘Condense’ feature eliminates transactions from the company file, hence all these transactions will be deleted from the Audit Trail report.
h) The reconciliation
When coming to the reconciliation, you will see the aftereffects of condensing the file, i.e. you will get a correct opening balance for the next reconciliation, checks & deposits no longer exist resulting in incorrect or no reconciliation reports. Lastly, the statement might be incorrect as the last reconciliation has gone.
Note: Always remember that your original reports are preserved and saved in the Backup & Archive Copy, or any other backup option you make. Therefore, before looking to use Condense tool, do reconcile all accounts, print the reconciliations, and the discrepancy reports. You can save these reports in the PDF format, and simultaneously create a Company file.
Usage QuickBooks Condense repair tool
For QuickBooks Desktop 2018 and previous versions
You are now aware of all the functionalities and after-effects that Condense function will have on the file and other reports. The next thing is to understand, how is to Use the tool. There are pre-requisites, after steps to consider for ‘Condensing the Company File’ process. There is a list below and will discuss these in somewhat detail to better understand the process.
- Find the Non-Condensable Transactions
- Run the Report
- Prepare your Company File
- Save Comparison Reports
- Condense QuickBooks Desktop Company File
- Period Copy Feature
- Match the pre and post Condense files.
1. Find the Non-Condensable Transactions
For QuickBooks Desktop Premier & Enterprise Solutions, you can run any ‘Report’ to view which are the transactions that will not get condensed. To recognize the Non-condensable transaction, you can view the unique link with which you can bring the transaction to your screen.
2. Run the report
The Next thing is to Run the Report. Follow the below steps
- Go to File Menu>> Choose Utilities>> Select Condense Data
- In the first window of the wizard tool, choose ‘Transactions before Specific date,’ and enter the correct date.
- Checkmark, ‘Create a report reflecting which transactions can’t remove.’ (optional)
- Choose Next, and select ‘Summarize Inventory Transactions’.
- Select how to Condense your inventory and choose ‘Next.’
- Now select the transaction groups you need to remove and choose ‘Next.’
- Press ‘Begin Condense’. QuickBooks will only run the report and will not Condense it here.
Note: When the report comes up, analyze it and fix every transaction that can be done. For, e.g., An open invoice was blocking the transactions related to it; you can close it and close all other transactions that has attached to it.
3. Prepare Company File
To prepare the company file, perform the below steps:
- Firstly, Remove data file closing date. Remember you cannot condense data for any periods coming after the ‘Closing date.’
Navigate to ‘Edit Menu’>>Preferences- Choose ‘Accounting’ and go to ‘Company Preferences’ option
- Choose Set/date Password in the closing date section
- Delete date in the ‘Closing date box.’
- Press OK
- Run Profit & Loss and Balance Sheet to look for transactions filled in before the company starting date. If these transactions have not modified to a proper date, then you cannot fix them after the condense.
- The next thing is to Re-sort Lists.
- Now ‘RUN’ rebuild & verify data utilities to make sure that there is no data damage.
- Now Copy company file & back it up. Next, save this copy and the back up at a secured location
4. Preserve/Save Comparison Reports
Some information is lost forever, once the file has condensed, The Comparison reports ensure that all your info is intact. You can compare these reports with the reports that come out after condensing. For future use, Print or Save the below things as PDF.
- Profit & Loss for all the dates (accrual based)
- Balance Sheets for all the dates (accrual based)
- Cash Flow statement.
- The A/R & A/P aging detail for all dates.
- Any other essential reports suggested by the bookkeeper or your accountant
5. Condense QuickBooks Desktop Company file
Now we are about to condense the company file. Perform the below steps.
Note: First of all, Condensing will take according to the Company file size and system performance. So, close all other applications for faster working. Secondly, if you are accessing the Company file via a network, then run the ‘Condense data Utility on the computer where it is saved.
Run the tool by:
- Navigate to ‘File menu
- Choose Utilities and go to ‘Condense Data.’
- You will be asked to condense the items you want to condense from the ‘list of transactions.’
- Choose here:
| Uncleared (unreconciled) bank and credit card transactions Transactions marked “To be printed.” Invoices and Estimates marked “To be sent” ALL Estimates, Sales Orders, Purchase Order, and Pending Invoices Whole Time and Mileage activities Transactions containing unbilled expenses and items | Accounts Customers and Jobs Vendors Other Names Items “Done” To Do notes Classes |
- Choose ‘Begin Condense.’
Note: Before starting the condensing QuickBooks will automatically create a Backup and an Archive Copy.
6. Period Copy
You can use this feature if you are a Premier Accountant or a QuickBooks Enterprise Version. The Period copy is actually a ‘Condensed Version’ of the that has data for a certain period.
7. Match the pre and post Condense files
Once the Condensing Company file is done, ensure that before and after Condense Data reports match each other.
To do this
- Re-run & print (else save it as PDF) the below reports
- Profit & Loss (accrual based)
- Balance sheet for all dates (accrual based)
- Cash Flow statement
Compare the before and after Condensed reports. They need to be identical. The condensed report should be the same as the pre-condensed one as they are based on ‘Accrual-based’ summary reports. Though, if there are discrepancies then:
- Look for transactions that are creating differences
- Restore the backup
- Repair damaged transactions & Rerun Condense data
- Create a New Company file or use the Restored Company file without Re-running the Condense data.
That is all about QuickBooks Condense Repair tool, its functionalities, and usage. It is an elaborate topic and requires careful attention at each step. Consider and study all the options before you decide to condense your Company file, as shown earlier it is an irreversible action. If you seek guidance in any of the above steps, then directly speak to a technical expert at QuickBooks Tech Support Number.
Thank you for visiting our site. We are always ready to help you with for any QB related queries or issues. Further, if you ever feel the need of taking advice from your fellow business owners that happened to be our existing subscribers, you can visit our thriving QuickBooks Community. Still, if you do not find an answer for your specific question within the community. In that case, you can also post your question in the community to get the requisite answer from the contributing members.